高级功能
LunaTalk 支持HTML格式,帮助用户开启华丽的视觉盛宴,体验游戏般的界面,解锁更多创意可能性!
HTML基础语法教学
懒人版
想做什么都可以告诉AI,直接让AI帮你做🦾 举例,直接写:
(必写)①全部回复以html格式进行回复。请注意:不要生成单独的<script>,所有的script都放到元素内联使用,必须script在html元素事件中,不支持<style>,必须scirpt内联且不使用style。
②人物的语言对话全部放在双引号内,字体全部使用蓝色(可以附颜色代码)、加粗。
③人物的内心独白全部放在括号内,字体全部使用粉色、斜体。
④以下内容以表格形式输出: … 表格背景颜色为浅蓝色 表格文字颜色为深蓝色
⑤以下选项以按钮形式输出: … 按钮颜色为浅蓝色 文字颜色为深蓝色
点击后自动填入文本框,参考格式如下:
<button onclick="
const textarea = document.querySelector('#lunatalk-input textarea.uni-textarea-textarea');
if (textarea) {
textarea.value='选项文本';
textarea.dispatchEvent(new Event('input', { bubbles: true }));
} else {
alert('没找到 textarea 哦');
}
">选项文本</button>
…
或者直接复制下方的各类格式,让AI参考这些格式帮你制作。
手动版
以下是为零基础用户设计的HTML极简教程,从变色到做表格全搞定,复制粘贴就能用!👇
一、文字
1. 颜色 & 大小
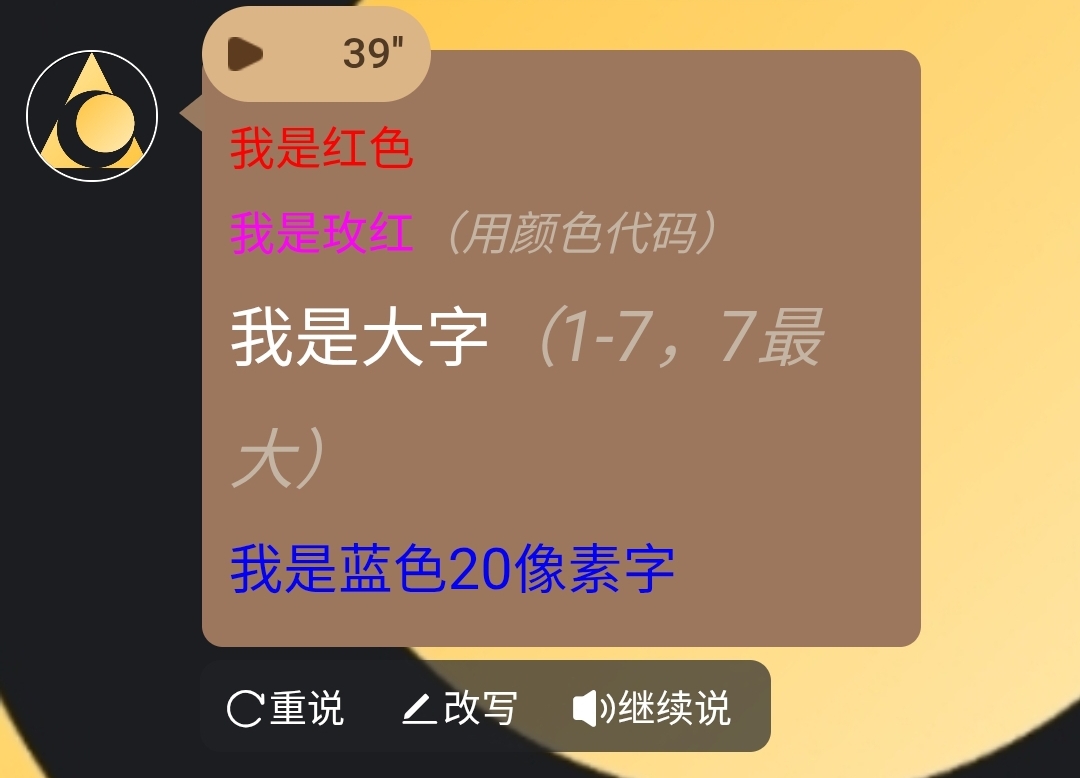
<font color="red">我是红色</font>

<font color="#FF00FF">我是玫红(用颜色代码)</font>

<font size="5">我是大字(1-7,7最大)</font>

<span style="color: blue; font-size: 20px;">我是蓝色20像素字</span>

标题文字 <h#>..........</h#> 将改为数字1~6;h1为最大字,h6为最小字
效果如图:
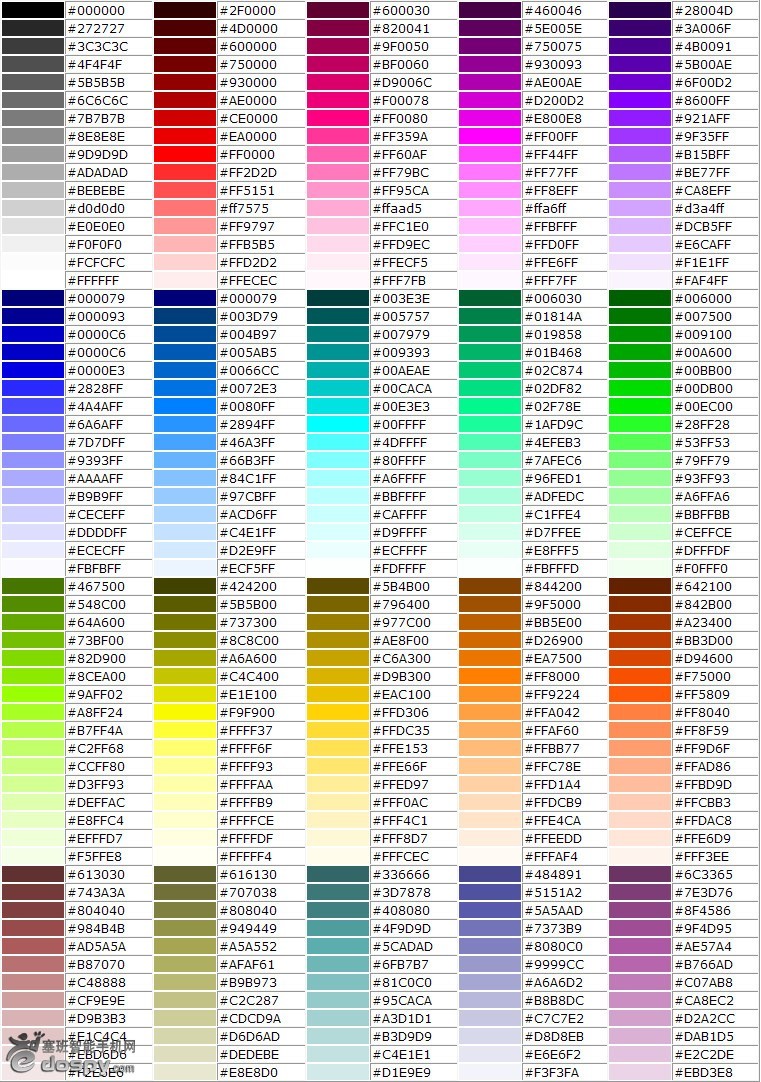
颜色代码大全:
2. 加粗 / 斜体 / 删除线
<b>我是粗体</b>
<i>我是斜体</i>
<u>我有下划线</u>
<s>我是删除线(不推荐)</s>
<del>我是删除线(标准写法)</del>
<small>显示小字体</small>
<big>显示大字体</big>
<tt>打字机字体</tt>
<sub>下标字</sub>
<sup>上标字</sup>
<blink>文字闪烁效果</blink>
3. 组合技
<b><i>我是粗斜体!</i></b>
```text

**4. 换行**

```text
换行(也称回车) <br>
分段 <p>
分隔线 <hr>
【1】分隔线的粗细 <hr size=点数>
【2】分隔线的宽度 <hr size=点数或百分比>
【3】分隔线对齐方向 <hr align="#">
#号可为 left:表向左对齐(预设值) center:表向中对齐 right:表向右对齐
【4】分隔线的颜色 <hr color=#rrggbb>
【5】实心分隔线 <hr noshade>
居中对齐 <center>..........</center>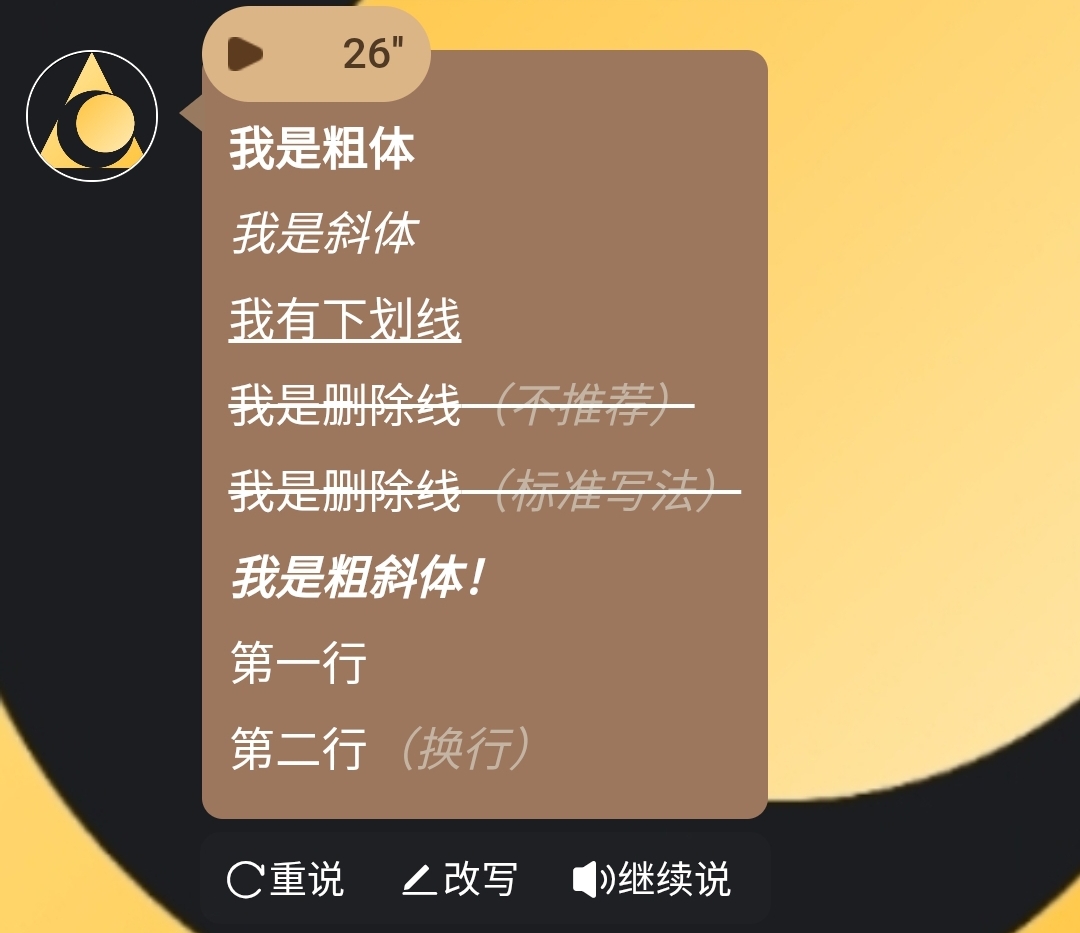
二、文字特效
(注:目前版本,动态特效需要 电脑鼠标悬停/手机点击文字 才能够开始显示特效)
1. 荧光文字
<div style="margin-bottom: 15px;">
     <span style="color: cyan; text-shadow: 0 0 5px cyan, 0 0 10px blue;">你好</span>
</div>
2. 闪烁文字
<div style="margin-bottom: 15px;">
      <span onmouseenter="(function(e){var v=true;setInterval(function(){v=!v;e.style.opacity=v?1:0;},500);})(this)">你好</span>
</div>
3. 渐变文字
<div style="margin-bottom: 15px;">
      <span onmouseenter="(function(e){var colors=['red','orange','yellow','green','blue','indigo','violet'];var i=0;setInterval(function(){e.style.color=colors[i%colors.length];i++;},300);})(this)">你好</span>
</div>
4. 打字机效果
<div style="margin-bottom: 15px;">
      <span onmouseenter="(function(e){var text='你好';var i=0;e.textContent='';setInterval(function(){if(i<=text.length){e.textContent=text.substring(0,i);i++;}else{i=0;e.textContent='';}},200);})(this)">你好</span>
</div>
5. 旋转文字
<div style="margin-bottom: 15px;">
      <span style="display:inline-block;" onmouseenter="(function(e){var r=0;setInterval(function(){r+=10;e.style.transform='rotate('+r+'deg)';},100);})(this)">你好</span>
</div>
6. 放大缩小
<div style="margin-bottom: 15px;">
      <span style="display:inline-block;" onmouseenter="(function(e){var s=1,d=0.02;setInterval(function(){s+=d;if(s>1.5||s<0.5)d=-d;e.style.transform='scale('+s+')';},50);})(this)">你好</span>
</div>
7. 左右摇摆
<div style="margin-bottom: 15px;">
      <span style="display:inline-block;" onmouseenter="(function(e){var a=0,d=5;setInterval(function(){a+=d;if(a>30||a<-30)d=-d;e.style.transform='rotate('+a+'deg)';},100);})(this)">你好</span>
</div>
8. 上下跳动
<div style="margin-bottom: 15px;">
      <span style="display:inline-block;" onmouseenter="(function(e){var y=0,d=5;setInterval(function(){y+=d;if(y>20||y<0)d=-d;e.style.transform='translateY('+y+'px)';},100);})(this)">你好</span>
</div>
9. 颜色脉冲
<div style="margin-bottom: 15px;">
      <span onmouseenter="(function(e){var colors=['red','orange','yellow','green','blue','indigo','violet'];var i=0;setInterval(function(){e.style.color=colors[i%colors.length];e.style.fontSize=(20+Math.sin(i*0.5)*5)+'px';i++;},200);})(this)">你好</span>
</div>
10. 随机移动
<div style="margin-bottom: 15px; position: relative; height: 60px;">
      <span style="position:absolute; left:0; top:0;" onmouseenter="(function(e){setInterval(function(){e.style.left=Math.random()*200+'px';e.style.top=Math.random()*40+'px';},500);})(this)">你好</span>
</div>
三、边框制作
1. 圆角边框
<div style="margin-bottom: 15px;">
      <span style="border: 2px solid black; border-radius: 15px; padding: 10px;">你好</span>
</div>
代码具体含义如下
<div style="margin-bottom: 15px;">
外层块,margin-bottom:15px 给下面元素留垂直空隙(与下一个块之间的间距)。

<span>
span 是行内元素,默认不换行。加了 border 和 padding 后仍然是行内盒子(在某些场景希望用 display:inline-block 更可控)。

border: 2px solid black;
边框由三部分组成:2px(线宽)、solid(线型:实线)、black(颜色)。

border-radius: 15px;
圆角半径,值越大越圆(50% 可做成圆形)。

padding: 10px;
内边距,把文字与边框之间撑开 10px。
2. 虚线边框
<div style="margin-bottom: 15px;">
      <span style="border: 2px dashed black; padding: 10px;">你好</span>
</div>
3. 双线边框
<div style="margin-bottom: 15px;">
       <span style="border: 4px double black; padding: 10px;">你好</span>
</div>
4. 阴影边框
<div style="margin-bottom: 15px;">
       <span style="box-shadow: 5px 5px 15px rgba(0,0,0,0.3); padding: 10px;">你好</span>
</div>
5. 3D边框
<div style="margin-bottom: 15px;">
       <span style="border: 5px outset #ccc; padding: 10px; background: #eee;">你好</span>
</div>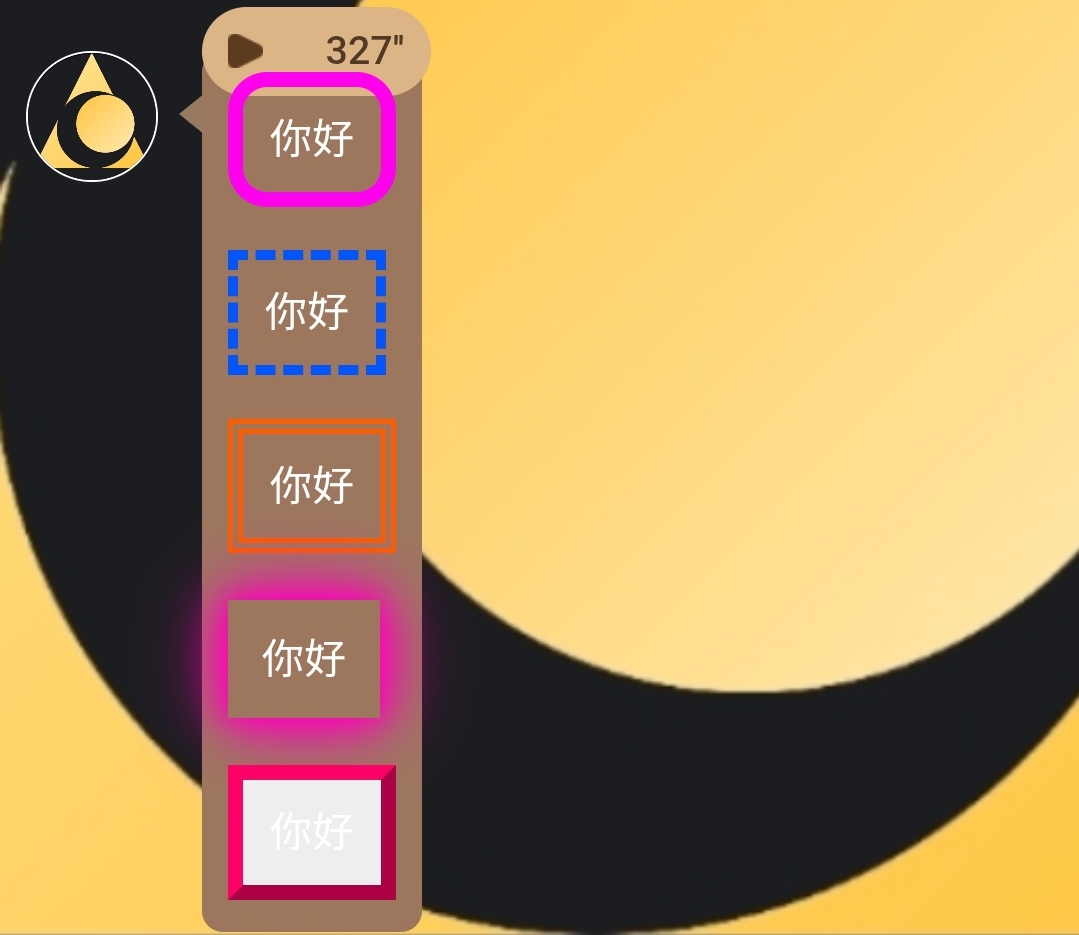
【霓虹灯边框】
1. 彩色圆角边框
<div style="margin-bottom: 15px;">
  <span style="border: 6px solid; border-radius: 15px; padding: 10px;"
    onmouseenter="(function(e){
      var colors=['red','orange','yellow','green','blue','indigo','violet'];
      var i=0;
      setInterval(function(){
        e.style.borderColor=colors[i%colors.length];
        i++;
      },300);
    })(this)">你好</span>
</div>
2. 彩色虚线边框
<div style="margin-bottom: 15px;">
  <span style="border: 4px dashed; padding: 10px;"
    onmouseenter="(function(e){
      var colors=['red','orange','yellow','green','blue','indigo','violet'];
      var i=0;
      setInterval(function(){
        e.style.borderColor=colors[i%colors.length];
        i++;
      },300);
    })(this)">你好</span>
</div>
3. 彩虹双线边框
<div style="margin-bottom: 15px;">
  <span style="border: 6px double; padding: 10px;"
    onmouseenter="(function(e){
      var colors=['red','orange','yellow','green','blue','indigo','violet'];
      var i=0;
      setInterval(function(){
        e.style.borderColor=colors[i%colors.length];
        i++;
      },300);
    })(this)">你好</span>
</div>
4. 彩色阴影边框
<div style="margin-bottom: 15px;">
  <span style="padding: 10px; border: 3px solid transparent;"
    onmouseenter="(function(e){
      var colors=['red','orange','yellow','green','blue','indigo','violet'];
      var i=0;
      setInterval(function(){
        var c=colors[i%colors.length];
        e.style.boxShadow='0 0 10px '+c+', 0 0 20px '+c+', 0 0 30px '+c;
        i++;
      },300);
    })(this)">你好</span>
</div>
5. 彩色 3D 边框
<div style="margin-bottom: 15px;">
  <span style="border: 6px outset; padding: 10px; background:#eee;"
    onmouseenter="(function(e){
      var colors=['red','orange','yellow','green','blue','indigo','violet'];
      var i=0;
      setInterval(function(){
        e.style.borderColor=colors[i%colors.length];
        i++;
      },300);
    })(this)">你好</span>
</div>
【流动彩虹边框(渐变平滑过渡)】
1. 彩色圆角边框(平滑彩虹过渡)
<div style="margin-bottom: 15px;">
  <span style="border: 6px solid; border-radius: 15px; padding: 10px;"
    onmouseenter="(function(e){
      var h=0;
      setInterval(function(){
        e.style.borderColor='hsl('+h+',100%,50%)';
        h=(h+2)%360;
      },50);
    })(this)">你好</span>
</div>
2. 彩色虚线边框(平滑彩虹过渡)
<div style="margin-bottom: 15px;">
  <span style="border: 4px dashed; padding: 10px;"
    onmouseenter="(function(e){
      var h=60;
      setInterval(function(){
        e.style.borderColor='hsl('+h+',100%,50%)';
        h=(h+2)%360;
      },50);
    })(this)">你好</span>
</div>
3. 彩虹双线边框(平滑彩虹过渡)
<div style="margin-bottom: 15px;">
  <span style="border: 6px double; padding: 10px;"
    onmouseenter="(function(e){
      var h=120;
      setInterval(function(){
        e.style.borderColor='hsl('+h+',100%,50%)';
        h=(h+2)%360;
      },50);
    })(this)">你好</span>
</div>
4. 彩色阴影边框(平滑流光效果)
<div style="margin-bottom: 15px;">
  <span style="padding: 10px; border: 3px solid transparent;"
    onmouseenter="(function(e){
      var h=180;
      setInterval(function(){
        var c='hsl('+h+',100%,50%)';
        e.style.boxShadow='0 0 10px '+c+', 0 0 20px '+c+', 0 0 30px '+c;
        h=(h+2)%360;
      },50);
    })(this)">你好</span>
</div>
5. 彩色 3D 边框(平滑彩虹过渡)
<div style="margin-bottom: 15px;">
  <span style="border: 6px outset; padding: 10px; background:#eee;"
    onmouseenter="(function(e){
      var h=240;
      setInterval(function(){
        e.style.borderColor='hsl('+h+',100%,50%)';
        h=(h+2)%360;
      },50);
    })(this)">你好</span>
</div>
四、背景制作
1. 彩色背景
<div style="margin-bottom: 15px;">
       <span style="background: linear-gradient(to right, red, orange, yellow, green, blue); padding: 10px; color: white;">你好</span>
</div>
2. 粉色背景
<div style="margin-bottom: 15px;">
       <span style="background: pink; padding: 10px; color: red;">你好</span>
</div>
3. 笔记背景
<div style="margin-bottom: 15px;">
       <span style="background: lightblue; color: black; padding: 10px;">你好</span>
</div>
4. 手机背景
<div style="margin-bottom: 15px;">
       <span style="background: linear-gradient(to bottom, #333, #999); color: white; padding: 10px;">你好</span>
</div>
5. 条纹背景
<div style="margin-bottom: 15px;">
      <span style="background: repeating-linear-gradient(45deg, #ff6b6b, #ff6b6b 10px, #ff8e8e 10px, #ff8e8e 20px); padding: 10px; color: white;">你好</span>
</div>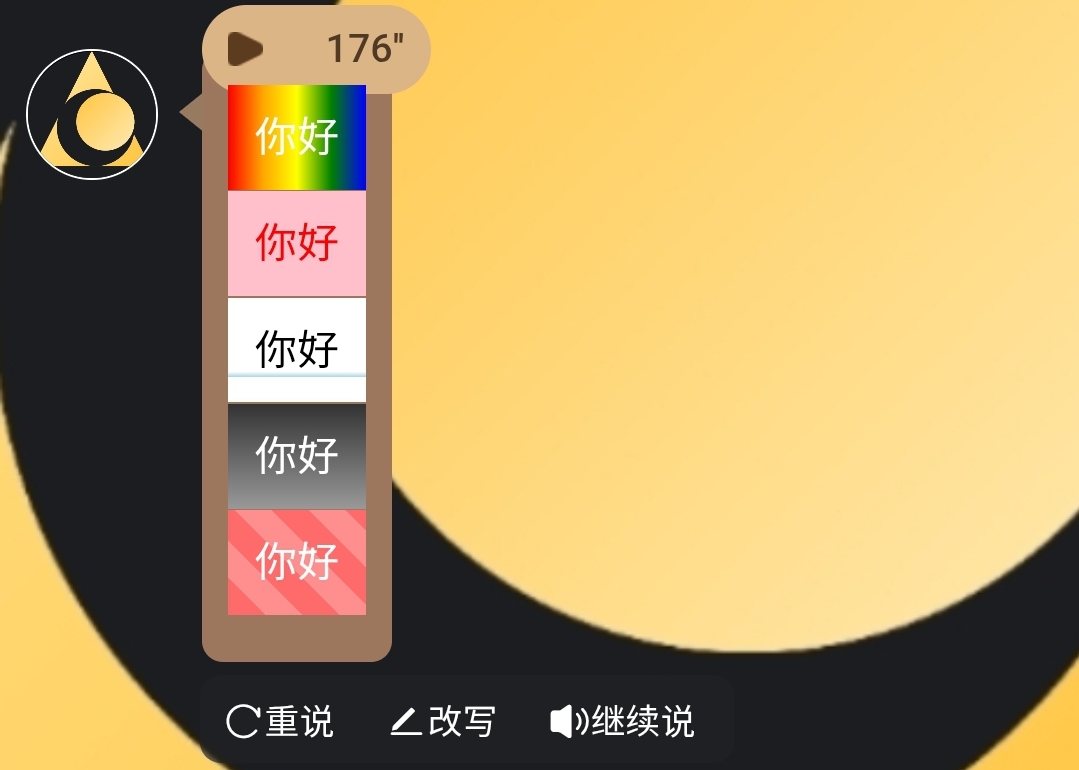
五、表格制作
1. 基础表格
<table border="1" style="border-collapse: collapse;">
  <tr>
    <th>姓名</th>
    <th>职业</th>
    <th>战斗力</th>
  </tr>
  <tr>
    <td>张三</td>
    <td>程序员</td>
    <td>80</td>
  </tr>
  <tr>
    <td>李四</td>
    <td>设计师</td>
    <td>95</td>
  </tr>
</table>
2. 单元格单独设置
<table>
  <tr>
    <td style="background-color: yellow;">重要数据</td>
    <td style="color: red;">红色文字
    </td>
  </tr>
</table>
3. 颜色表格
<table style="border-collapse: collapse; width: 100%;">
  <tr style="background-color: #000079; color: white;">
    <th>姓名</th>
    <th>職業</th>
    <th>戰鬥力</th>
  </tr>
  <tr style="background-color: #B9B9FF;">
    <td>張三</td>
    <td> 程序員</td>
    <td>  80</td>
  </tr>
  <tr style="background-color: #B9B9FF;">
    <td>李四</td>
    <td> 設計師</td>
    <td>  95</td>
  </tr>
</table>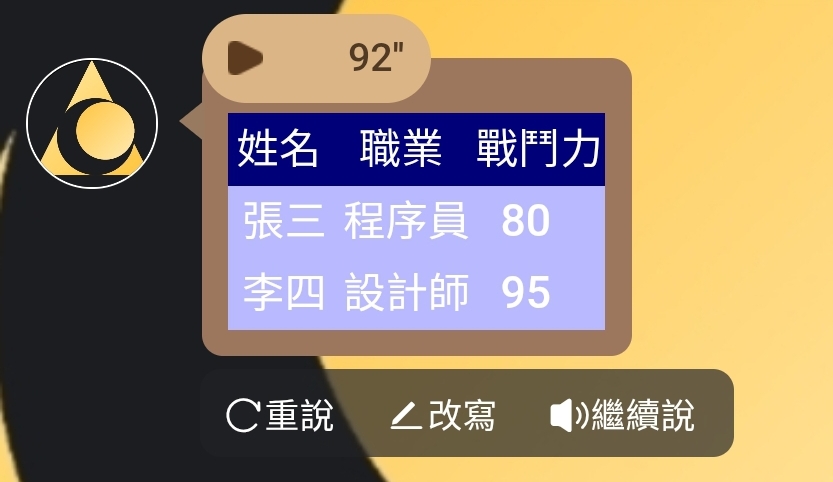
六、按钮与交互
1. 普通按钮
<button>点我试试</button>2. 带颜色的按钮
<!-- 蓝色系 -->
<button style="color: white; background-color: #2196F3;">蓝色</button>

<!-- 绿色系 -->
<button style="color: white; background-color: #4CAF50;">绿色</button>

<!-- 红色系 -->
<button style="color: white; background-color: #f44336;">红色</button>

<!-- 紫色系 -->
<button style="color: white; background-color: #9C27B0;">紫色</button>

<!-- 黑色系 -->
<button style="color: white; background-color: #000000;">黑色</button>
3. 渐变炫彩按钮
<button style="
  color: white;
  background: linear-gradient(to right, #FF6B8B, #FF8E53);
  padding: 12px 24px;
  border: none;
  border-radius: 8px;
  font-size: 16px;
  font-weight: bold;
  cursor: pointer;
">渐变炫彩按钮</button>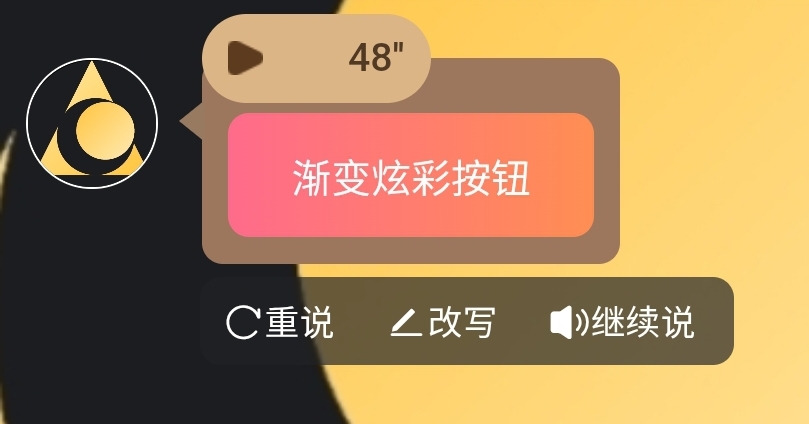
4. 点击按钮自动填入文本框
<button onclick="
const textarea = document.querySelector('#lunatalk-input textarea.uni-textarea-textarea');
if (textarea) {
textarea.value='你好';
textarea.dispatchEvent(new Event('input', { bubbles: true }));
} else {
alert('没找到 textarea 哦');
}
" style="background-color: white; color: black;">你好</button>
5. 点击按钮自动填入剪贴板
<button onclick="
  const textarea = document.querySelector('#lunatalk-input textarea.uni-textarea-textarea');
  if (textarea) {
    textarea.value='你好';
    textarea.dispatchEvent(new Event('input', { bubbles: true }));
    navigator.clipboard.writeText('你好');
  } else {
    alert('没找到 textarea 哦');
  }
" style="background-color: white; color: black;">你好</button>
6. 彩色可点击按钮
<button style="
  color: white;
  background: linear-gradient(to right, #FF6B8B, #FF8E53);
  padding: 12px 24px;
  border: none;
  border-radius: 8px;
  font-size: 16px;
  font-weight: bold;
  cursor: pointer;
  transition: background 0.5s;
"
onclick="
  // 点击时:找到 textarea 并填入文字
  const textarea = document.querySelector('#lunatalk-input textarea.uni-textarea-textarea');
  if (textarea) {
    textarea.value='渐变炫彩按钮';
    textarea.dispatchEvent(new Event('input', { bubbles: true }));
  } else {
    alert('没找到 textarea 哦');
  }
">
  渐变炫彩按钮
</button>
7. 分区布局
<div style="background: lavender; padding: 10px; border-radius: 10px;">
      <h3>优雅分区</h3>
      <br>
      <p>这里可以放任何内容~</p>
      <br>
      <button style="background: purple; color: white;">紫色按钮</button>
</div>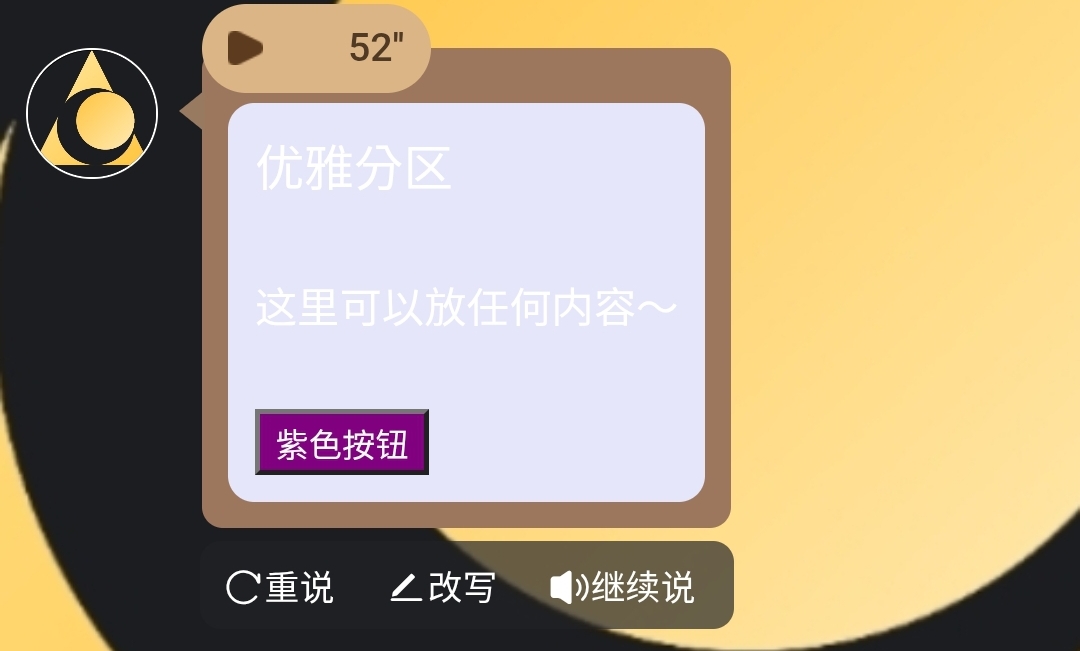
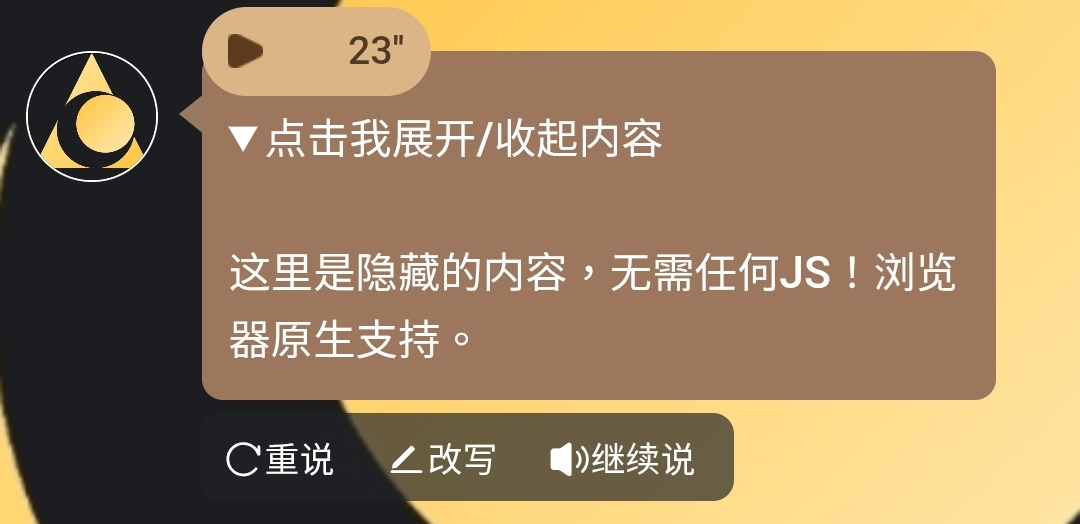
8. 展开/收起
<details>
  <summary>点击我展开/收起内容</summary>
  <p>这里是隐藏的内容,无需任何JS!浏览器原生支持。</p>
</details>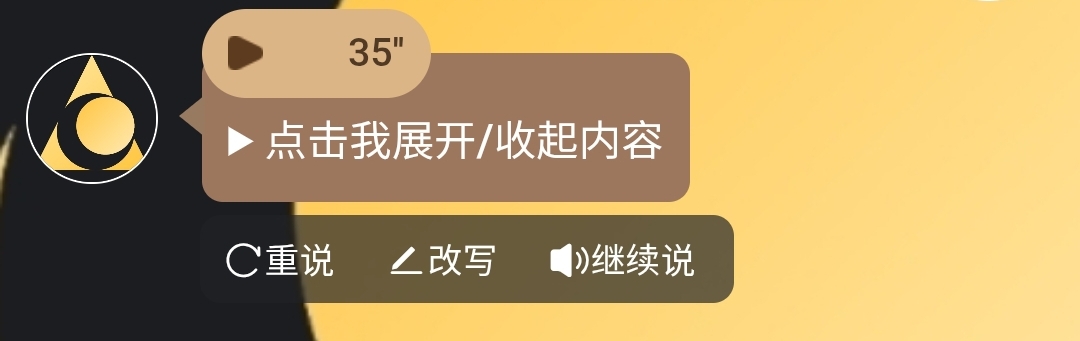
七、注意事项
1. 只写body
如果AI在帮你写格式时,输出了<!DOCTYPE html>、<html lang="zh-CN">、<head>等开头内容,请将其删除,我们的聊天框内只需要<body>的部分。2. 隐藏文本
可以通过在代码中插入的方式,来要求AI每次回复都输出这些格式。隐藏文本不会显示,用户看不到,但AI能看到。
举例:
八、具体示范
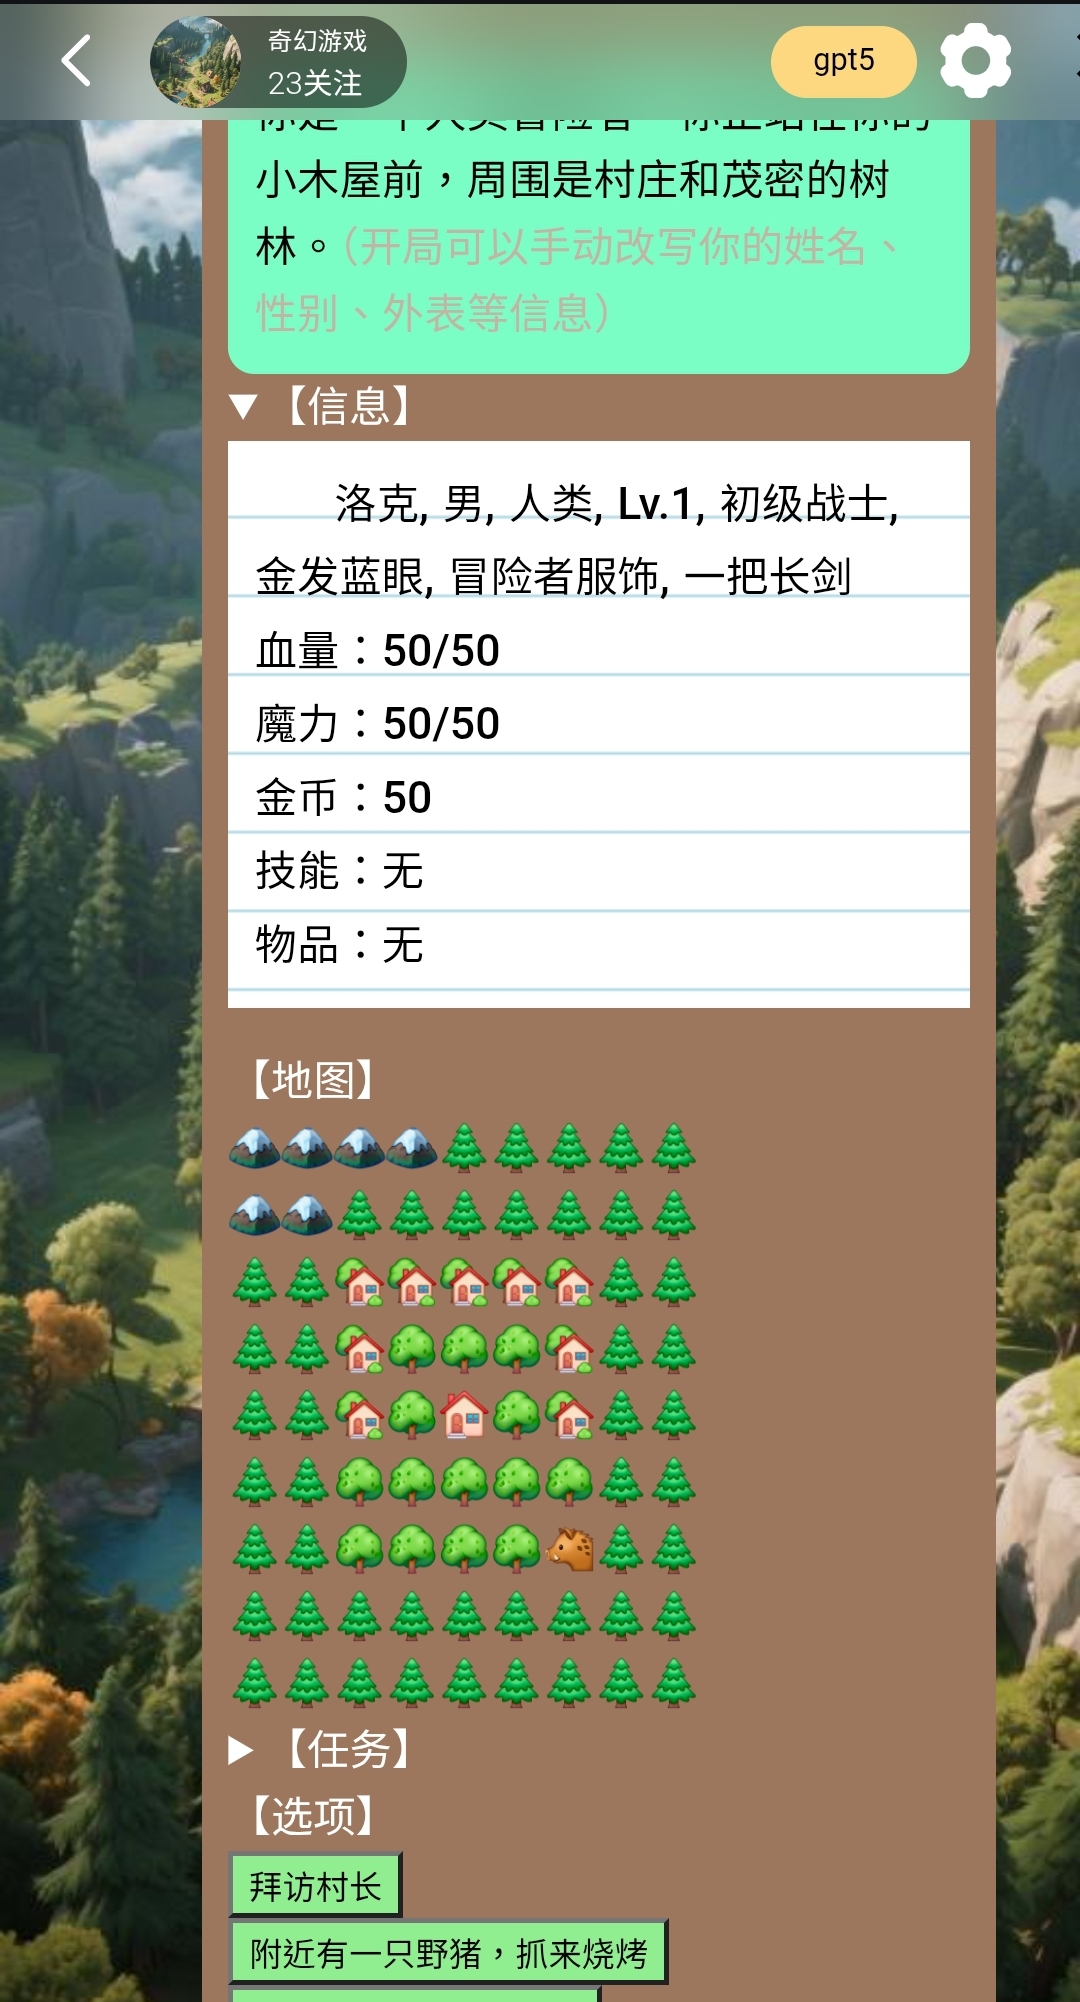
1. 状态栏示范
(这个只是示范用的,没有细究视觉效果,希望大家能做出更好看的卡面。请不要直接复制并发布为新卡,违者删卡并取消作者奖励。)
完整代码如下:
<details>
  <summary>【场景】</summary>
  <div style="background: #7AFEC6; color: black; padding: 10px; border-radius: 10px;">
  <p>你是一个人类冒险者。你正站在你的小木屋前,周围是村庄和茂密的树林。(开局可以手动改写你的姓名、性别、外表等信息)</p>
  </div>
</details>

<details>
  <summary>【信息】</summary>
  <div style="margin-bottom: 15px;">
    <div style="
      display:inline-block;
      background-image: repeating-linear-gradient(
        white 0px,
        white 28px,
        lightblue 29px,
        white 30px
      );
      color: black;
      padding: 10px;
      line-height: 28px;
    ">
      洛克, 男, 人类, Lv.1, 初级战士, 金发蓝眼, 冒险者服饰, 一把长剑
      <p>血量:50/50</p>
      <p>魔力:50/50</p>
      <p>金币:50</p>
      <p>技能:无</p>
      <p>物品:无</p>
    </div>
  </div>
</details>

【地图】<p>
🏔️🏔️🏔️🏔️🌲🌲🌲🌲🌲<p>
🏔️🏔️🌲🌲🌲🌲🌲🌲🌲<p>
🌲🌲🏡🏡🏡🏡🏡🌲🌲<p>
🌲🌲🏡🌳🌳🌳🏡🌲🌲<p>
🌲🌲🏡🌳🏠🌳🏡🌲🌲<p>
🌲🌲🌳🌳🌳🌳🌳🌲🌲<p>
🌲🌲🌳🌳🌳🌳🐗🌲🌲<p>
🌲🌲🌲🌲🌲🌲🌲🌲🌲<p>
🌲🌲🌲🌲🌲🌲🌲🌲🌲

<details>
  <summary>【任务】</summary>
  <p>无</p>
</details>

【选项】
<p>
<button onclick="
const textarea = document.querySelector('#lunatalk-input textarea.uni-textarea-textarea');
if (textarea) {
textarea.value='拜访村长';
textarea.dispatchEvent(new Event('input', { bubbles: true }));
} else {
alert('没找到 textarea 哦');
}
" style="background-color: lightgreen; color: black;">拜访村长</button>
<p>
<button onclick="
const textarea = document.querySelector('#lunatalk-input textarea.uni-textarea-textarea');
if (textarea) {
textarea.value='附近有一只野猪,抓来烧烤';
textarea.dispatchEvent(new Event('input', { bubbles: true }));
} else {
alert('没找到 textarea 哦');
}
" style="background-color: lightgreen; color: black;">附近有一只野猪,抓来烧烤</button>
<p>
<button onclick="
const textarea = document.querySelector('#lunatalk-input textarea.uni-textarea-textarea');
if (textarea) {
textarea.value='我要转职!';
textarea.dispatchEvent(new Event('input', { bubbles: true }));
} else {
alert('没找到 textarea 哦');
}
" style="background-color: lightgreen; color: black;">我要转职!(改职业)</button>
<p>
<button onclick="
const textarea = document.querySelector('#lunatalk-input textarea.uni-textarea-textarea');
if (textarea) {
textarea.value='我要转生!';
textarea.dispatchEvent(new Event('input', { bubbles: true }));
} else {
alert('没找到 textarea 哦');
}
" style="background-color: lightgreen; color: black;">我要转生!</button>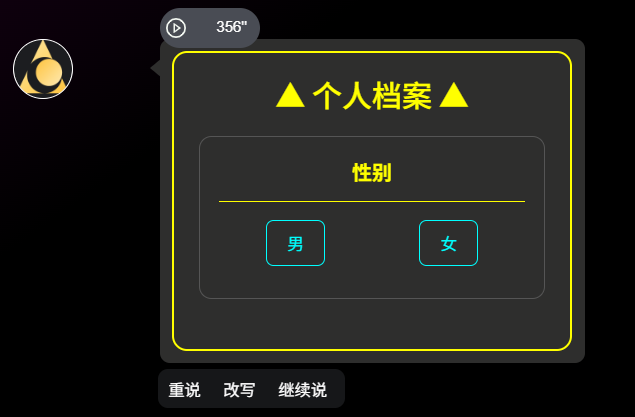
2. 卡面示范
(点击按钮后,文字自动复制到剪贴板)
<body style="background-color:#000; font-family:Arial, sans-serif; display:flex; justify-content:center; align-items:center; min-height:100vh; color:#fff;">

  <div style="border:2px solid yellow; border-radius:12px; padding:20px; width:320px;">

    <!-- 标题 -->
    <h2 style="text-align:center; color:yellow; margin:0 0 20px 0;">▲ 个人档案 ▲</h2>

    <!-- 性别 -->
    <div style="border:1px solid #555; border-radius:10px; padding:15px; margin-bottom:20px;">
      <div style="text-align:center; font-weight:bold; color:yellow; margin-bottom:10px;">性别</div>
      <hr style="border: none; border-top:1px solid yellow; margin:5px 0 15px 0;">
      <div style="display:flex; justify-content:space-around; margin-bottom:10px;">
        <button style="color:cyan; background:transparent; border:1px solid cyan; border-radius:6px; padding:8px 16px; cursor:pointer;"
          onclick="(function(){
            const txt='男';
            const textarea=document.querySelector('#lunatalk-input textarea.uni-textarea-textarea');
            if(textarea){textarea.value=txt;textarea.dispatchEvent(new Event('input',{bubbles:true}));}
            navigator.clipboard.writeText(txt);
          })()">男</button>

        <button style="color:cyan; background:transparent; border:1px solid cyan; border-radius:6px; padding:8px 16px; cursor:pointer;"
          onclick="(function(){
            const txt='女';
            const textarea=document.querySelector('#lunatalk-input textarea.uni-textarea-textarea');
            if(textarea){textarea.value=txt;textarea.dispatchEvent(new Event('input',{bubbles:true}));}
            navigator.clipboard.writeText(txt);
          })()">女</button>
现在就制作一张精美有趣的角色卡试试吧!