고급 기능
LunaTalk은 HTML 형식을 지원하여 사용자가 화려한 시각적 향연을 열고 게임 같은 인터페이스를 경험하며 더 많은 창의적 가능성을 해제할 수 있도록 돕습니다!
HTML 기본 구문 교육
간편 버전
무엇을 하고 싶은지 AI에게 말하고, AI에게 직접 도움을 요청하세요🦾 예시, 직접 작성:
(필수 작성) ①모든 답장은 HTML 형식으로 답장하세요. 참고: 별도의 <script>를 생성하지 말고, 모든 script를 요소 인라인으로 사용하세요. script는 HTML 요소 이벤트 내에 있어야 하며, <style>은 지원하지 않으며, script는 인라인이어야 하고 style을 사용하지 않아야 합니다.
②인물의 언어 대화는 모두 쌍따옴표 안에 넣고, 글꼴은 모두 파란색(색상 코드 첨부 가능), 굵게 표시.
③인물의 내면 독백은 모두 괄호 안에 넣고, 글꼴은 모두 분홍색, 기울임꼴.
④다음 내용을 표 형식으로 출력: … 표 배경색은 연한 파란색 표 텍스트 색상은 진한 파란색
⑤다음 선택지를 버튼 형식으로 출력: … 버튼 색상은 연한 파란색 텍스트 색상은 진한 파란색
클릭 후 자동으로 텍스트 상자에 입력, 참고 형식은 다음과 같습니다:
<button onclick="
const textarea = document.querySelector('#lunatalk-input textarea.uni-textarea-textarea');
if (textarea) {
textarea.value='선택지 텍스트';
textarea.dispatchEvent(new Event('input', { bubbles: true }));
} else {
alert('textarea를 찾을 수 없습니다');
}
">선택지 텍스트</button>
…
또는 아래의 다양한 형식을 직접 복사하여 AI가 이러한 형식을 참고하도록 하여 제작할 수 있습니다.
수동 버전
다음은 초보자를 위해 설계된 HTML 극간단 튜토리얼로, 색상 변경부터 표 만들기까지 모두 해결할 수 있으며, 복사 붙여넣기만 하면 사용할 수 있습니다!👇
1. 텍스트
1. 색상 및 크기
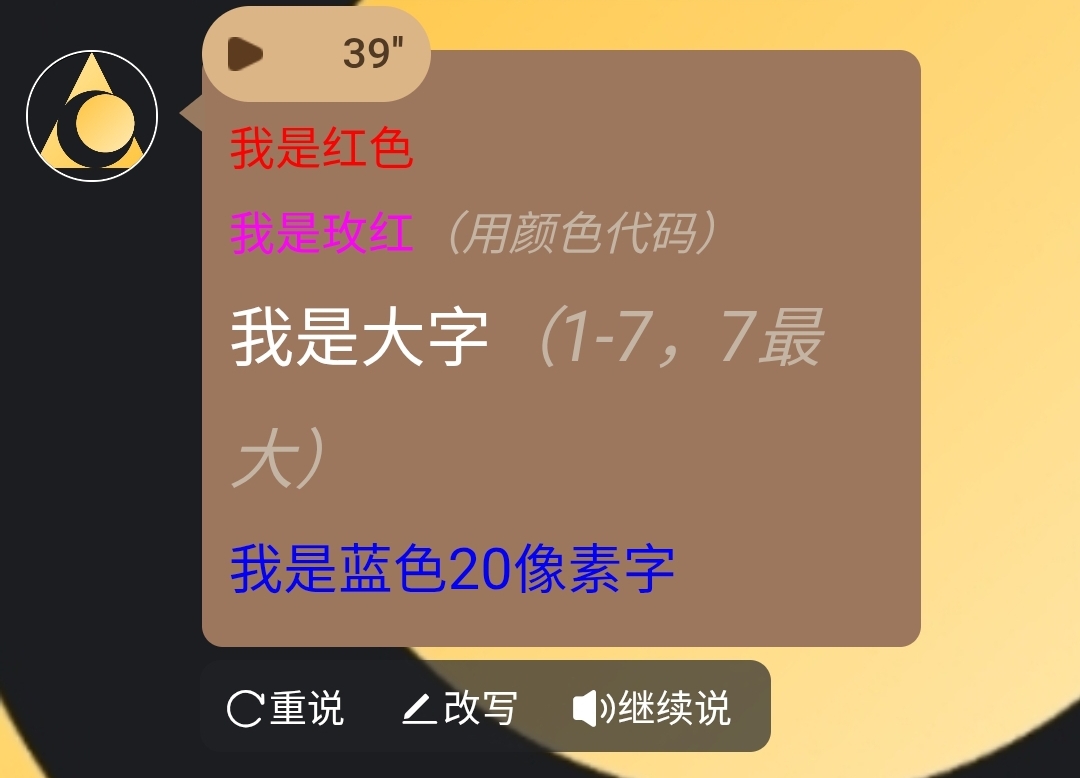
<font color="red">나는 빨간색</font>

<font color="#FF00FF">나는 자홍색(색상 코드 사용)</font>

<font size="5">나는 큰 글자(1-7, 7이 가장 큼)</font>

<span style="color: blue; font-size: 20px;">나는 파란색 20픽셀 글자</span>

제목 텍스트 <h#>..........</h#> #을 숫자 1~6으로 변경; h1이 가장 큰 글자, h6이 가장 작은 글자
효과는 그림과 같습니다:
색상 코드 전체:
2. 굵게 / 기울임꼴 / 취소선
<b>나는 굵은 글꼴</b>
<i>나는 기울임꼴</i>
<u>나는 밑줄이 있습니다</u>
<s>나는 취소선입니다(권장하지 않음)</s>
<del>나는 취소선입니다(표준 작성법)</del>
<small>작은 글꼴 표시</small>
<big>큰 글꼴 표시</big>
<tt>타자기 글꼴</tt>
<sub>아래 첨자</sub>
<sup>위 첨자</sup>
<blink>텍스트 깜박임 효과</blink>
3. 조합 기술
<b><i>나는 굵은 기울임꼴!</i></b>4. 줄 바꿈
줄 바꿈(엔터라고도 함) <br>
단락 나누기 <p>
구분선 <hr>
【1】구분선의 두께 <hr size=점수>
【2】구분선의 너비 <hr size=점수 또는 백분율>
【3】구분선 정렬 방향 <hr align="#">
#는 left: 왼쪽 정렬(기본값) center: 중앙 정렬 right: 오른쪽 정렬
【4】구분선의 색상 <hr color=#rrggbb>
【5】실선 구분선 <hr noshade>
중앙 정렬 <center>..........</center>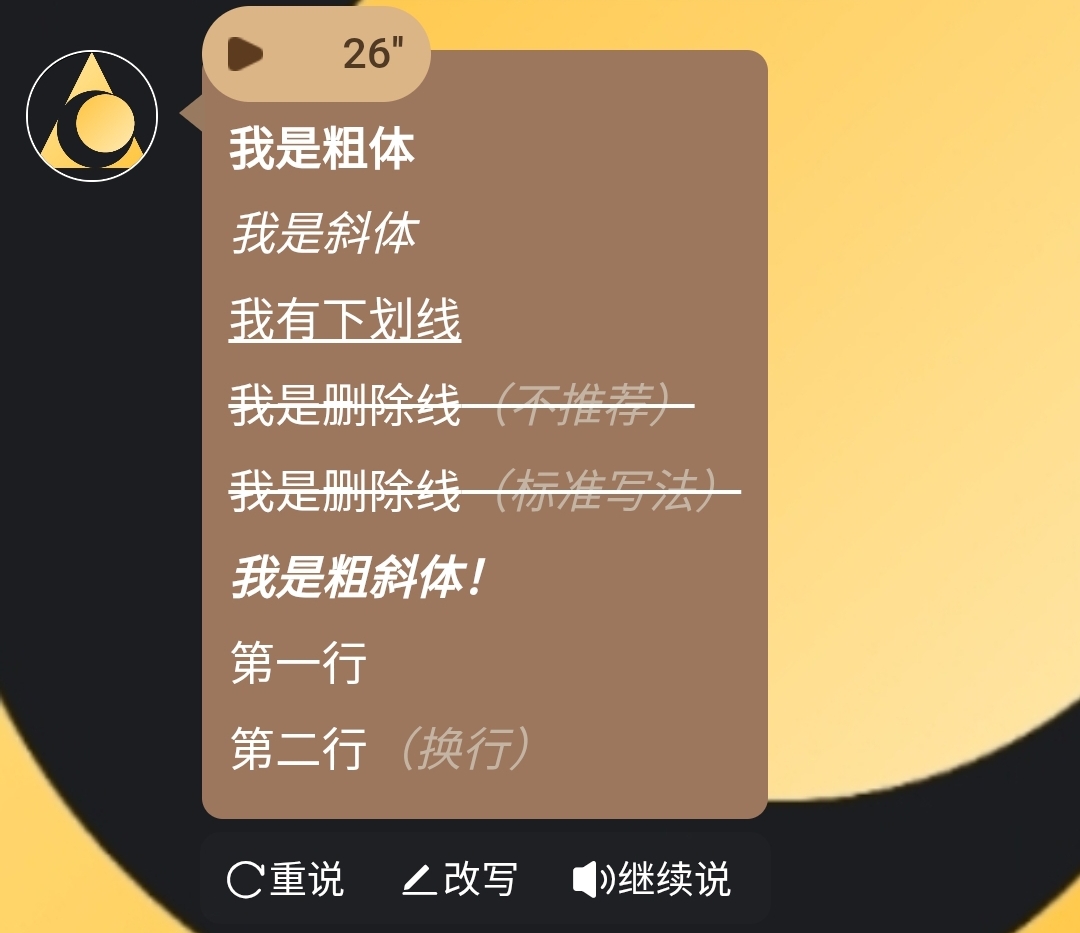
2. 텍스트 특수 효과
(참고: 현재 버전에서는 동적 특수 효과를 위해 컴퓨터 마우스를 텍스트 위에 올리거나/휴대폰으로 텍스트를 클릭해야 특수 효과가 표시되기 시작합니다)
1. 형광 텍스트
<div style="margin-bottom: 15px;">
     <span style="color: cyan; text-shadow: 0 0 5px cyan, 0 0 10px blue;">안녕하세요</span>
</div>
2. 깜박이는 텍스트
<div style="margin-bottom: 15px;">
      <span onmouseenter="(function(e){var v=true;setInterval(function(){v=!v;e.style.opacity=v?1:0;},500);})(this)">안녕하세요</span>
</div>
3. 그라데이션 텍스트
<div style="margin-bottom: 15px;">
      <span onmouseenter="(function(e){var colors=['red','orange','yellow','green','blue','indigo','violet'];var i=0;setInterval(function(){e.style.color=colors[i%colors.length];i++;},300);})(this)">안녕하세요</span>
</div>
4. 타자기 효과
<div style="margin-bottom: 15px;">
      <span onmouseenter="(function(e){var text='안녕하세요';var i=0;e.textContent='';setInterval(function(){if(i<=text.length){e.textContent=text.substring(0,i);i++;}else{i=0;e.textContent='';}},200);})(this)">안녕하세요</span>
</div>
5. 회전 텍스트
<div style="margin-bottom: 15px;">
      <span style="display:inline-block;" onmouseenter="(function(e){var r=0;setInterval(function(){r+=10;e.style.transform='rotate('+r+'deg)';},100);})(this)">안녕하세요</span>
</div>
6. 확대 축소
<div style="margin-bottom: 15px;">
      <span style="display:inline-block;" onmouseenter="(function(e){var s=1,d=0.02;setInterval(function(){s+=d;if(s>1.5||s<0.5)d=-d;e.style.transform='scale('+s+')';},50);})(this)">안녕하세요</span>
</div>
7. 좌우 흔들림
<div style="margin-bottom: 15px;">
      <span style="display:inline-block;" onmouseenter="(function(e){var a=0,d=5;setInterval(function(){a+=d;if(a>30||a<-30)d=-d;e.style.transform='rotate('+a+'deg)';},100);})(this)">안녕하세요</span>
</div>
8. 위아래 점프
<div style="margin-bottom: 15px;">
      <span style="display:inline-block;" onmouseenter="(function(e){var y=0,d=5;setInterval(function(){y+=d;if(y>20||y<0)d=-d;e.style.transform='translateY('+y+'px)';},100);})(this)">안녕하세요</span>
</div>
9. 색상 펄스
<div style="margin-bottom: 15px;">
      <span onmouseenter="(function(e){var colors=['red','orange','yellow','green','blue','indigo','violet'];var i=0;setInterval(function(){e.style.color=colors[i%colors.length];e.style.fontSize=(20+Math.sin(i*0.5)*5)+'px';i++;},200);})(this)">안녕하세요</span>
</div>
10. 무작위 이동
<div style="margin-bottom: 15px; position: relative; height: 60px;">
      <span style="position:absolute; left:0; top:0;" onmouseenter="(function(e){setInterval(function(){e.style.left=Math.random()*200+'px';e.style.top=Math.random()*40+'px';},500);})(this)">안녕하세요</span>
</div>
3. 테두리 제작
1. 둥근 테두리
<div style="margin-bottom: 15px;">
      <span style="border: 2px solid black; border-radius: 15px; padding: 10px;">안녕하세요</span>
</div>
코드의 구체적인 의미는 다음과 같습니다
<div style="margin-bottom: 15px;">
외부 블록, margin-bottom:15px는 아래 요소에 수직 간격을 줍니다(다음 블록과의 간격).

<span>
span은 인라인 요소로 기본적으로 줄 바꿈하지 않습니다. border와 padding을 추가해도 여전히 인라인 박스입니다(일부 시나리오에서는 display:inline-block을 사용하는 것이 더 제어 가능).

border: 2px solid black;
테두리는 세 부분으로 구성됩니다: 2px(선 너비), solid(선 유형: 실선), black(색상).

border-radius: 15px;
둥근 모서리 반경, 값이 클수록 더 둥글어집니다(50%는 원형으로 만들 수 있음).

padding: 10px;
내부 여백, 텍스트와 테두리 사이를 10px 벌립니다.
2. 점선 테두리
<div style="margin-bottom: 15px;">
      <span style="border: 2px dashed black; padding: 10px;">안녕하세요</span>
</div>
3. 이중선 테두리
<div style="margin-bottom: 15px;">
       <span style="border: 4px double black; padding: 10px;">안녕하세요</span>
</div>
4. 그림자 테두리
<div style="margin-bottom: 15px;">
       <span style="box-shadow: 5px 5px 15px rgba(0,0,0,0.3); padding: 10px;">안녕하세요</span>
</div>
5. 3D 테두리
<div style="margin-bottom: 15px;">
       <span style="border: 5px outset #ccc; padding: 10px; background: #eee;">안녕하세요</span>
</div>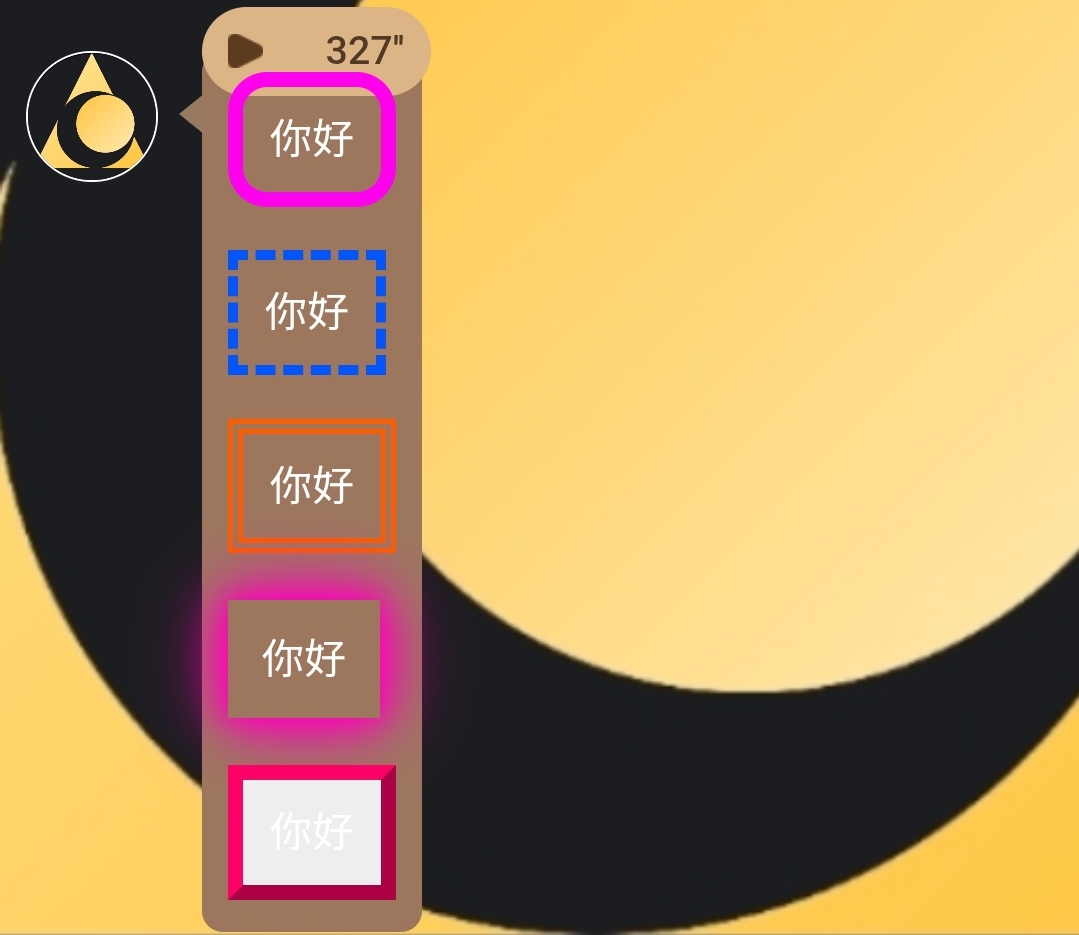
【네온 테두리】
1. 컬러 둥근 테두리
<div style="margin-bottom: 15px;">
  <span style="border: 6px solid; border-radius: 15px; padding: 10px;"
    onmouseenter="(function(e){
      var colors=['red','orange','yellow','green','blue','indigo','violet'];
      var i=0;
      setInterval(function(){
        e.style.borderColor=colors[i%colors.length];
        i++;
      },300);
    })(this)">안녕하세요</span>
</div>
2. 컬러 점선 테두리
<div style="margin-bottom: 15px;">
  <span style="border: 4px dashed; padding: 10px;"
    onmouseenter="(function(e){
      var colors=['red','orange','yellow','green','blue','indigo','violet'];
      var i=0;
      setInterval(function(){
        e.style.borderColor=colors[i%colors.length];
        i++;
      },300);
    })(this)">안녕하세요</span>
</div>
3. 무지개 이중선 테두리
<div style="margin-bottom: 15px;">
  <span style="border: 6px double; padding: 10px;"
    onmouseenter="(function(e){
      var colors=['red','orange','yellow','green','blue','indigo','violet'];
      var i=0;
      setInterval(function(){
        e.style.borderColor=colors[i%colors.length];
        i++;
      },300);
    })(this)">안녕하세요</span>
</div>
4. 컬러 그림자 테두리
<div style="margin-bottom: 15px;">
  <span style="padding: 10px; border: 3px solid transparent;"
    onmouseenter="(function(e){
      var colors=['red','orange','yellow','green','blue','indigo','violet'];
      var i=0;
      setInterval(function(){
        var c=colors[i%colors.length];
        e.style.boxShadow='0 0 10px '+c+', 0 0 20px '+c+', 0 0 30px '+c;
        i++;
      },300);
    })(this)">안녕하세요</span>
</div>
5. 컬러 3D 테두리
<div style="margin-bottom: 15px;">
  <span style="border: 6px outset; padding: 10px; background:#eee;"
    onmouseenter="(function(e){
      var colors=['red','orange','yellow','green','blue','indigo','violet'];
      var i=0;
      setInterval(function(){
        e.style.borderColor=colors[i%colors.length];
        i++;
      },300);
    })(this)">안녕하세요</span>
</div>
【흐르는 무지개 테두리(그라데이션 부드러운 전환)】
1. 컬러 둥근 테두리(부드러운 무지개 전환)
<div style="margin-bottom: 15px;">
  <span style="border: 6px solid; border-radius: 15px; padding: 10px;"
    onmouseenter="(function(e){
      var h=0;
      setInterval(function(){
        e.style.borderColor='hsl('+h+',100%,50%)';
        h=(h+2)%360;
      },50);
    })(this)">안녕하세요</span>
</div>
2. 컬러 점선 테두리(부드러운 무지개 전환)
<div style="margin-bottom: 15px;">
  <span style="border: 4px dashed; padding: 10px;"
    onmouseenter="(function(e){
      var h=60;
      setInterval(function(){
        e.style.borderColor='hsl('+h+',100%,50%)';
        h=(h+2)%360;
      },50);
    })(this)">안녕하세요</span>
</div>
3. 무지개 이중선 테두리(부드러운 무지개 전환)
<div style="margin-bottom: 15px;">
  <span style="border: 6px double; padding: 10px;"
    onmouseenter="(function(e){
      var h=120;
      setInterval(function(){
        e.style.borderColor='hsl('+h+',100%,50%)';
        h=(h+2)%360;
      },50);
    })(this)">안녕하세요</span>
</div>
4. 컬러 그림자 테두리(부드러운 유광 효과)
<div style="margin-bottom: 15px;">
  <span style="padding: 10px; border: 3px solid transparent;"
    onmouseenter="(function(e){
      var h=180;
      setInterval(function(){
        var c='hsl('+h+',100%,50%)';
        e.style.boxShadow='0 0 10px '+c+', 0 0 20px '+c+', 0 0 30px '+c;
        h=(h+2)%360;
      },50);
    })(this)">안녕하세요</span>
</div>
5. 컬러 3D 테두리(부드러운 무지개 전환)
<div style="margin-bottom: 15px;">
  <span style="border: 6px outset; padding: 10px; background:#eee;"
    onmouseenter="(function(e){
      var h=240;
      setInterval(function(){
        e.style.borderColor='hsl('+h+',100%,50%)';
        h=(h+2)%360;
      },50);
    })(this)">안녕하세요</span>
</div>
4. 배경 제작
1. 컬러 배경
<div style="margin-bottom: 15px;">
       <span style="background: linear-gradient(to right, red, orange, yellow, green, blue); padding: 10px; color: white;">안녕하세요</span>
</div>
2. 분홍색 배경
<div style="margin-bottom: 15px;">
       <span style="background: pink; padding: 10px; color: red;">안녕하세요</span>
</div>
3. 노트 배경
<div style="margin-bottom: 15px;">
       <span style="background: lightblue; color: black; padding: 10px;">안녕하세요</span>
</div>
4. 휴대폰 배경
<div style="margin-bottom: 15px;">
       <span style="background: linear-gradient(to bottom, #333, #999); color: white; padding: 10px;">안녕하세요</span>
</div>
5. 줄무늬 배경
<div style="margin-bottom: 15px;">
      <span style="background: repeating-linear-gradient(45deg, #ff6b6b, #ff6b6b 10px, #ff8e8e 10px, #ff8e8e 20px); padding: 10px; color: white;">안녕하세요</span>
</div>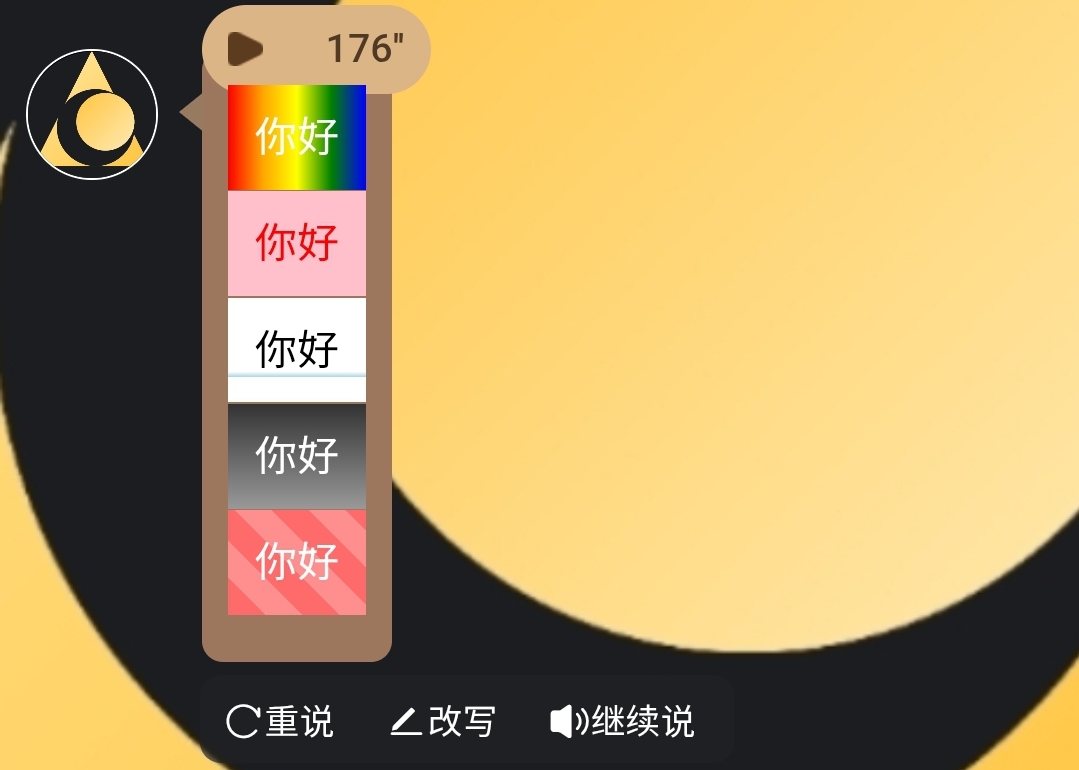
5. 표 제작
1. 기본 표
<table border="1" style="border-collapse: collapse;">
  <tr>
    <th>이름</th>
    <th>직업</th>
    <th>전투력</th>
  </tr>
  <tr>
    <td>홍길동</td>
    <td>프로그래머</td>
    <td>80</td>
  </tr>
  <tr>
    <td>김철수</td>
    <td>디자이너</td>
    <td>95</td>
  </tr>
</table>
2. 셀 개별 설정
<table>
  <tr>
    <td style="background-color: yellow;">중요 데이터</td>
    <td style="color: red;">빨간색 텍스트
    </td>
  </tr>
</table>
3. 컬러 표
<table style="border-collapse: collapse; width: 100%;">
  <tr style="background-color: #000079; color: white;">
    <th>이름</th>
    <th>직업</th>
    <th>전투력</th>
  </tr>
  <tr style="background-color: #B9B9FF;">
    <td>홍길동</td>
    <td>프로그래머</td>
    <td>80</td>
  </tr>
  <tr style="background-color: #B9B9FF;">
    <td>김철수</td>
    <td>디자이너</td>
    <td>95</td>
  </tr>
</table>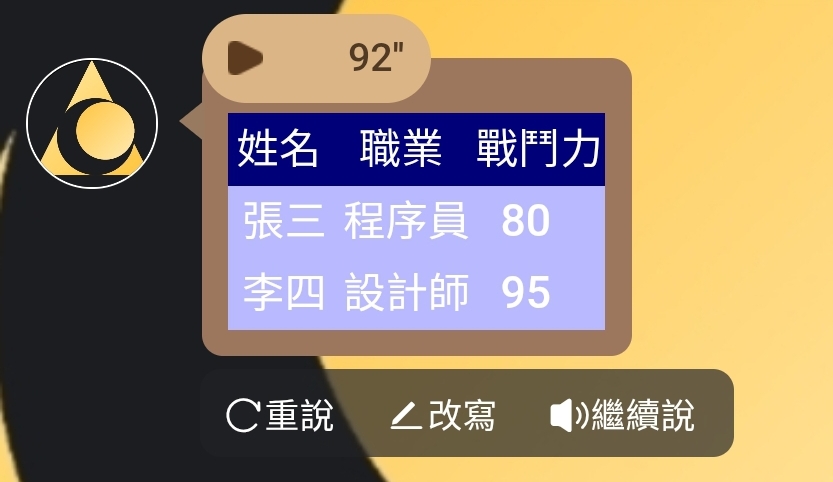
6. 버튼 및 상호작용
1. 일반 버튼
<button>클릭해 보세요</button>2. 색상이 있는 버튼
<!-- 파란색 계열 -->
<button style="color: white; background-color: #2196F3;">파란색</button>

<!-- 녹색 계열 -->
<button style="color: white; background-color: #4CAF50;">녹색</button>

<!-- 빨간색 계열 -->
<button style="color: white; background-color: #f44336;">빨간색</button>

<!-- 보라색 계열 -->
<button style="color: white; background-color: #9C27B0;">보라색</button>

<!-- 검은색 계열 -->
<button style="color: white; background-color: #000000;">검은색</button>
3. 그라데이션 화려한 버튼
<button style="
  color: white;
  background: linear-gradient(to right, #FF6B8B, #FF8E53);
  padding: 12px 24px;
  border: none;
  border-radius: 8px;
  font-size: 16px;
  font-weight: bold;
  cursor: pointer;
">그라데이션 화려한 버튼</button>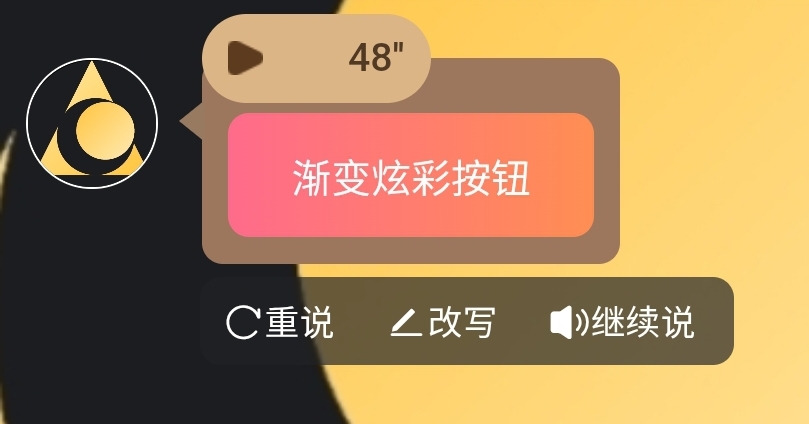
4. 클릭하면 텍스트 상자에 자동 입력되는 버튼
<button onclick="
const textarea = document.querySelector('#lunatalk-input textarea.uni-textarea-textarea');
if (textarea) {
textarea.value='안녕하세요';
textarea.dispatchEvent(new Event('input', { bubbles: true }));
} else {
alert('textarea를 찾을 수 없습니다');
}
" style="background-color: white; color: black;">안녕하세요</button>
5. 클릭하면 클립보드에 자동 입력되는 버튼
<button onclick="
  const textarea = document.querySelector('#lunatalk-input textarea.uni-textarea-textarea');
  if (textarea) {
    textarea.value='안녕하세요';
    textarea.dispatchEvent(new Event('input', { bubbles: true }));
    navigator.clipboard.writeText('안녕하세요');
  } else {
    alert('textarea를 찾을 수 없습니다');
  }
" style="background-color: white; color: black;">안녕하세요</button>
6. 컬러 클릭 가능 버튼
<button style="
  color: white;
  background: linear-gradient(to right, #FF6B8B, #FF8E53);
  padding: 12px 24px;
  border: none;
  border-radius: 8px;
  font-size: 16px;
  font-weight: bold;
  cursor: pointer;
  transition: background 0.5s;
"
onclick="
  // 클릭 시: textarea를 찾아 텍스트 입력
  const textarea = document.querySelector('#lunatalk-input textarea.uni-textarea-textarea');
  if (textarea) {
    textarea.value='그라데이션 화려한 버튼';
    textarea.dispatchEvent(new Event('input', { bubbles: true }));
  } else {
    alert('textarea를 찾을 수 없습니다');
  }
">
  그라데이션 화려한 버튼
</button>
7. 영역 레이아웃
<div style="background: lavender; padding: 10px; border-radius: 10px;">
      <h3>우아한 영역</h3>
      <br>
      <p>여기에 원하는 내용을 넣을 수 있습니다~</p>
      <br>
      <button style="background: purple; color: white;">보라색 버튼</button>
</div>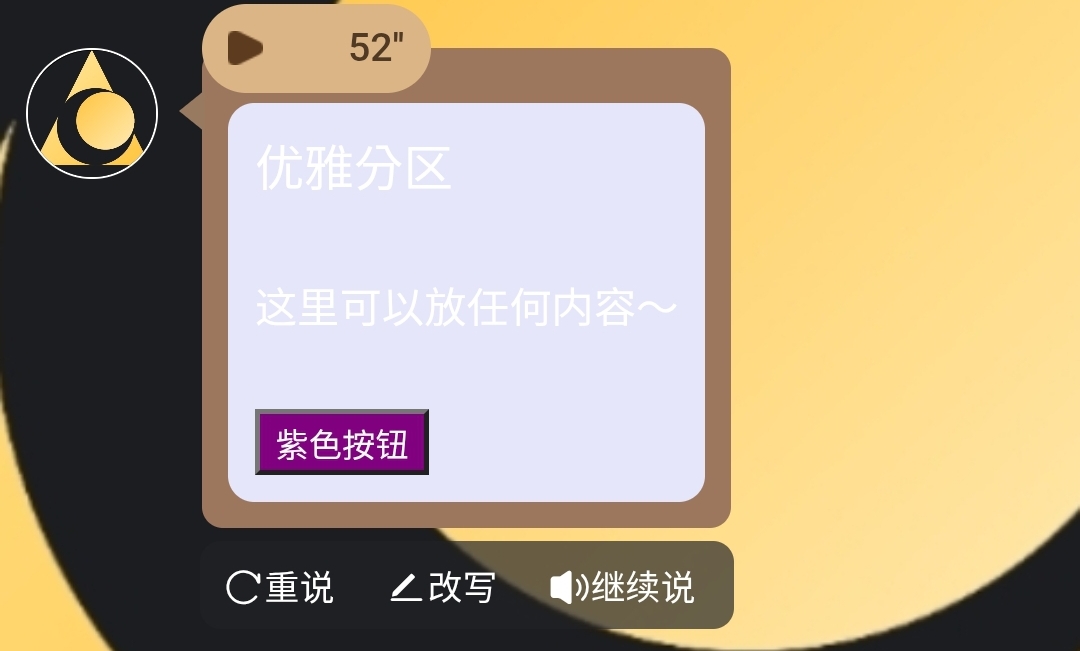
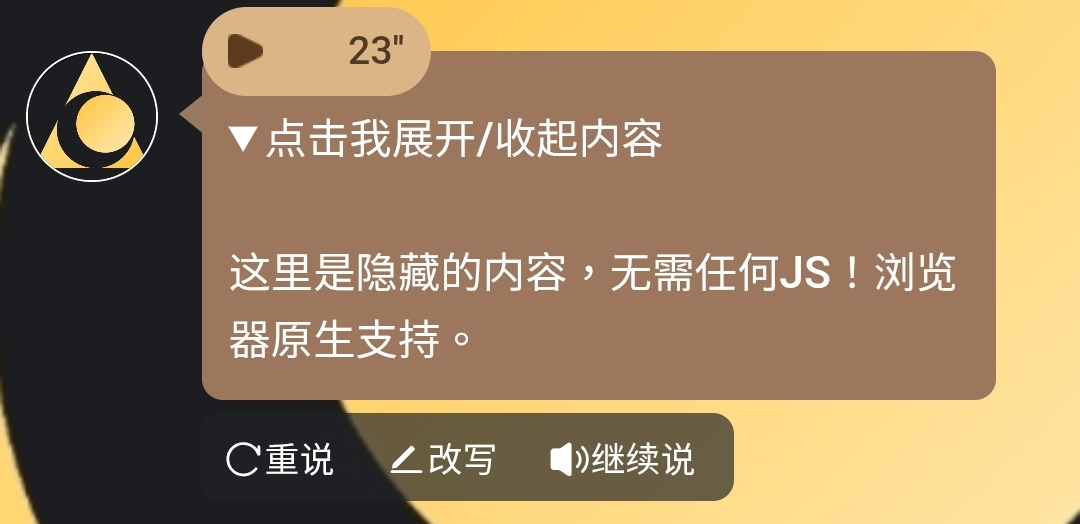
8. 펼치기/접기
<details>
  <summary>클릭하면 내용 펼치기/접기</summary>
  <p>여기는 숨겨진 내용으로, JS가 필요 없습니다! 브라우저 네이티브 지원.</p>
</details>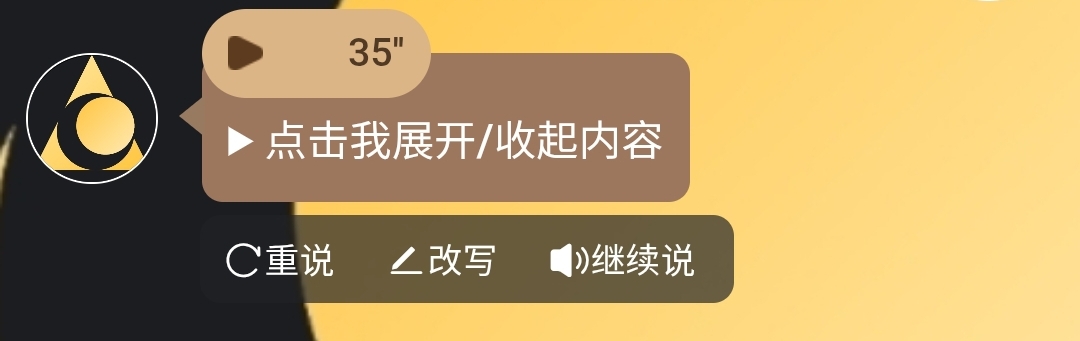
7. 주의사항
1. body만 작성
AI가 형식을 도와 작성할 때 <!DOCTYPE html>, <html lang="zh-CN">, <head> 등의 시작 내용을 출력하면 삭제하세요. 채팅창에는 <body> 부분만 필요합니다.2. 숨겨진 텍스트
코드에 를 삽입하여 AI가 매번 답장할 때 이러한 형식을 출력하도록 요청할 수 있습니다. 숨겨진 텍스트는 표시되지 않으며 사용자는 볼 수 없지만 AI는 볼 수 있습니다.
예시:
8. 구체적인 예시
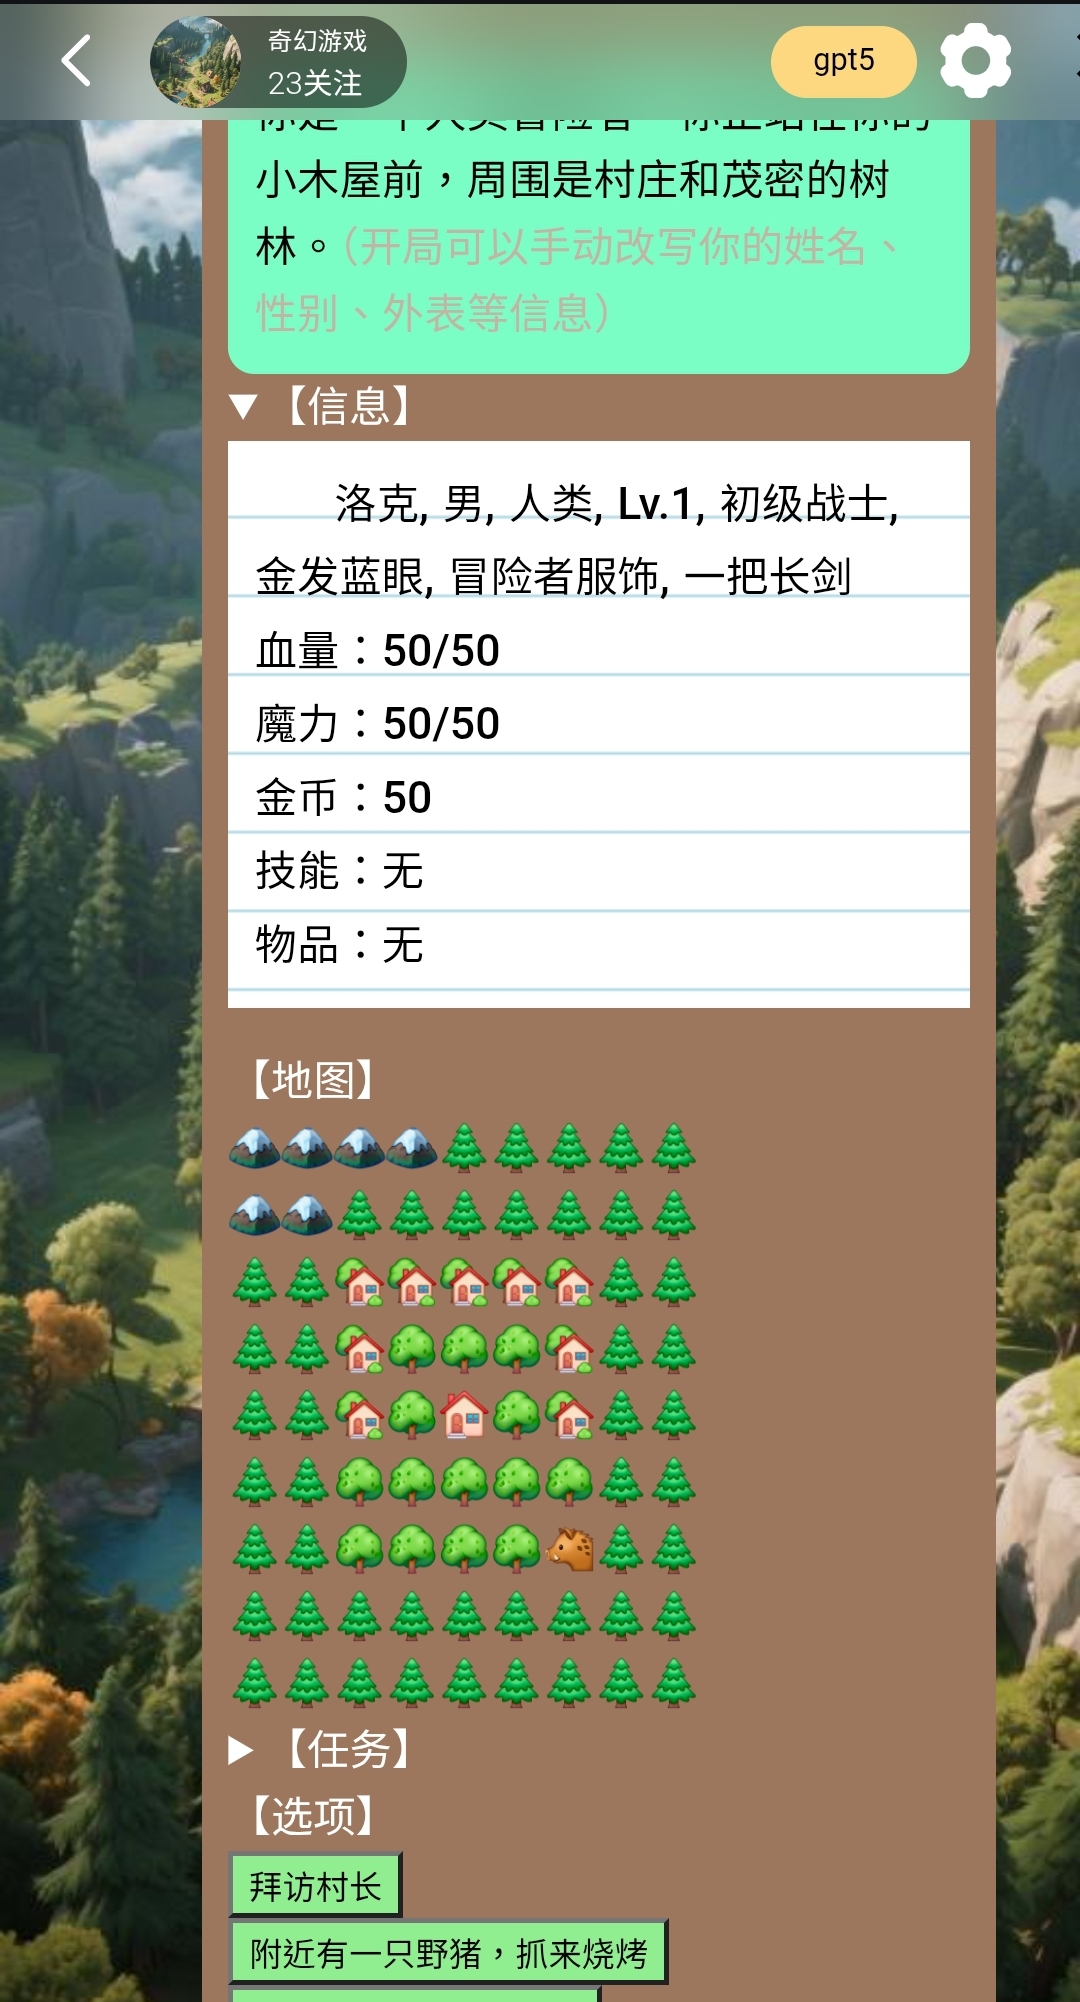
1. 상태 표시줄 예시
(이것은 예시일 뿐이며, 시각적 효과를 세밀하게 다루지 않았습니다. 여러분이 더 멋진 카드를 만들기를 바랍니다. 직접 복사하여 새 카드로 게시하지 마세요. 위반 시 카드 삭제 및 작가 보상 취소.)
전체 코드는 다음과 같습니다:
<details>
  <summary>【장면】</summary>
  <div style="background: #7AFEC6; color: black; padding: 10px; border-radius: 10px;">
  <p>당신은 인간 모험가입니다. 당신은 작은 오두막 앞에 서 있으며, 주변은 마을과 울창한 숲입니다. (시작 시 이름, 성별, 외모 등의 정보를 수동으로 수정할 수 있습니다)</p>
  </div>
</details>

<details>
  <summary>【정보】</summary>
  <div style="margin-bottom: 15px;">
    <div style="
      display:inline-block;
      background-image: repeating-linear-gradient(
        white 0px,
        white 28px,
        lightblue 29px,
        white 30px
      );
      color: black;
      padding: 10px;
      line-height: 28px;
    ">
      로크, 남성, 인간, Lv.1, 초급 전사, 금발 파란 눈, 모험가 복장, 긴 검 하나
      <p>체력: 50/50</p>
      <p>마력: 50/50</p>
      <p>금화: 50</p>
      <p>스킬: 없음</p>
      <p>아이템: 없음</p>
    </div>
  </div>
</details>

【지도】<p>
🏔️🏔️🏔️🏔️🌲🌲🌲🌲🌲<p>
🏔️🏔️🌲🌲🌲🌲🌲🌲🌲<p>
🌲🌲🏡🏡🏡🏡🏡🌲🌲<p>
🌲🌲🏡🌳🌳🌳🏡🌲🌲<p>
🌲🌲🏡🌳🏠🌳🏡🌲🌲<p>
🌲🌲🌳🌳🌳🌳🌳🌲🌲<p>
🌲🌲🌳🌳🌳🌳🐗🌲🌲<p>
🌲🌲🌲🌲🌲🌲🌲🌲🌲<p>
🌲🌲🌲🌲🌲🌲🌲🌲🌲

<details>
  <summary>【임무】</summary>
  <p>없음</p>
</details>

【선택지】
<p>
<button onclick="
const textarea = document.querySelector('#lunatalk-input textarea.uni-textarea-textarea');
if (textarea) {
textarea.value='촌장 방문';
textarea.dispatchEvent(new Event('input', { bubbles: true }));
} else {
alert('textarea를 찾을 수 없습니다');
}
" style="background-color: lightgreen; color: black;">촌장 방문</button>
<p>
<button onclick="
const textarea = document.querySelector('#lunatalk-input textarea.uni-textarea-textarea');
if (textarea) {
textarea.value='근처에 멧돼지가 있어, 잡아서 구워 먹기';
textarea.dispatchEvent(new Event('input', { bubbles: true }));
} else {
alert('textarea를 찾을 수 없습니다');
}
" style="background-color: lightgreen; color: black;">근처에 멧돼지가 있어, 잡아서 구워 먹기</button>
<p>
<button onclick="
const textarea = document.querySelector('#lunatalk-input textarea.uni-textarea-textarea');
if (textarea) {
textarea.value='전직하고 싶어요!';
textarea.dispatchEvent(new Event('input', { bubbles: true }));
} else {
alert('textarea를 찾을 수 없습니다');
}
" style="background-color: lightgreen; color: black;">전직하고 싶어요!(직업 변경)</button>
<p>
<button onclick="
const textarea = document.querySelector('#lunatalk-input textarea.uni-textarea-textarea');
if (textarea) {
textarea.value='환생하고 싶어요!';
textarea.dispatchEvent(new Event('input', { bubbles: true }));
} else {
alert('textarea를 찾을 수 없습니다');
}
" style="background-color: lightgreen; color: black;">환생하고 싶어요!</button>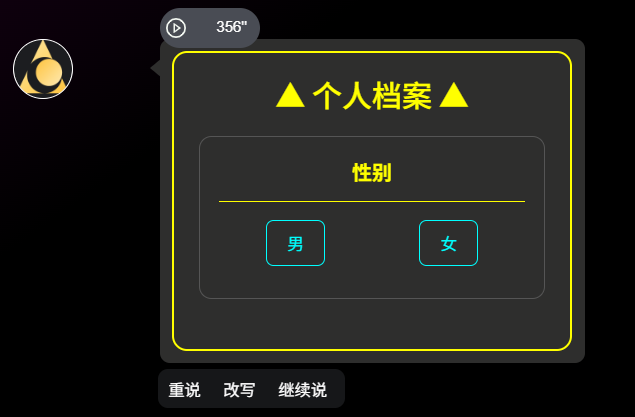
2. 카드 디자인 예시
(버튼 클릭 후 텍스트가 자동으로 클립보드에 복사됨)
<body style="background-color:#000; font-family:Arial, sans-serif; display:flex; justify-content:center; align-items:center; min-height:100vh; color:#fff;">

  <div style="border:2px solid yellow; border-radius:12px; padding:20px; width:320px;">

    <!-- 제목 -->
    <h2 style="text-align:center; color:yellow; margin:0 0 20px 0;">▲ 개인 프로필 ▲</h2>

    <!-- 성별 -->
    <div style="border:1px solid #555; border-radius:10px; padding:15px; margin-bottom:20px;">
      <div style="text-align:center; font-weight:bold; color:yellow; margin-bottom:10px;">성별</div>
      <hr style="border: none; border-top:1px solid yellow; margin:5px 0 15px 0;">
      <div style="display:flex; justify-content:space-around; margin-bottom:10px;">
        <button style="color:cyan; background:transparent; border:1px solid cyan; border-radius:6px; padding:8px 16px; cursor:pointer;"
          onclick="(function(){
            const txt='남성';
            const textarea=document.querySelector('#lunatalk-input textarea.uni-textarea-textarea');
            if(textarea){textarea.value=txt;textarea.dispatchEvent(new Event('input',{bubbles:true}));}
            navigator.clipboard.writeText(txt);
          })()">남성</button>

        <button style="color:cyan; background:transparent; border:1px solid cyan; border-radius:6px; padding:8px 16px; cursor:pointer;"
          onclick="(function(){
            const txt='여성';
            const textarea=document.querySelector('#lunatalk-input textarea.uni-textarea-textarea');
            if(textarea){textarea.value=txt;textarea.dispatchEvent(new Event('input',{bubbles:true}));}
            navigator.clipboard.writeText(txt);
          })()">여성</button>
이제 정교하고 재미있는 캐릭터 카드를 만들어 보세요!